
Aristeia!: Regelzusammenfassung
Noch ist Aristeia! nicht erschienen und Corvus Belli halten sich immer noch etwas bedeckt. Allerdings konnte man das Brettspiel im Infinity-Universum u.a. bereits zur GenCon testen. Auf dem Blog von Lead Rising findet sich eine Zusammenfassung.
Aristeia Rules Summary
Aristeia is a competitive, two player game where players build their perfect teams of fighters in order to duke it out in the HexaDome. It’s very much a standalone board game rather than a port or hybrid of Infinity and generally it is best to look at it with any preconceptions.
As the release date is not so far away (before the end of the year I think!) it’s time to start looking at the rules and mechanics behind the game. A lot of the information has been revealed at the Interplanetary, but as reporting has been pretty sporadic so far I’m going to take the chance to explain many of the rules, mechanics and concepts.
I’m going to try and cover as much as is practical of the basics without going into the nitty-gritty. Apologies if I have some of the terminology/timing down wrong, some of it has been glossed over for the sake of simplicity but also I’m still pretty new to the game of course and may have a made a couple of odd, unintentional mistakes.
There are some things that I can’t show yet but I hope this will be interesting to those looking forward to the game or even just sitting on the fence.
Images have been taken from the upcoming Reference Guide and How to Play booklets, are property of Corvus Belli and are used with permission.
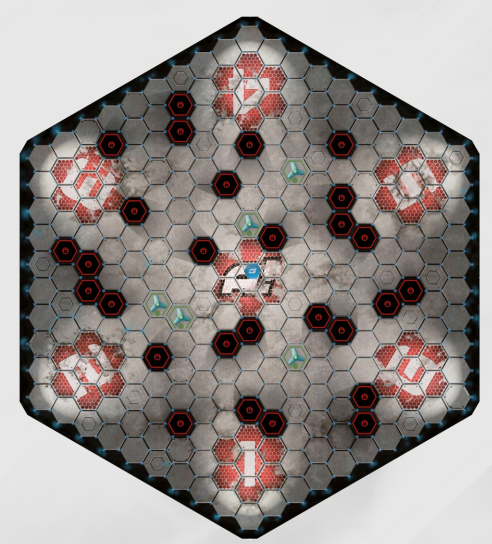
The Board
The Aristeia HexaDome is a six sided battlefield which is 19 hexes across, corner to corner and 10 hexes per side. It has seven Deployment Zones, marked in red, each of which is 7 hexes in size. In addition to functioning as Deployment Zones, the red areas also serve as Scoring Zones depending on the scenario. In this example you can see the blue marker in the centre which denotes that zone as being the Scoring Zone.
A number of the hexes are blocked out in red and black and are used to denote full cover. In addition, players will place a number of counters representing partial cover around the arena, depending on the scenario they are playing, which you can see represented by the blue trefoils above.
The game uses simplified Line of Sight (LoS) rules where intervening characters and full cover obstructs LoS and stops many Attacks and Actions from being used. Partial Cover allows the character to add a Black dice to their pool when attacking or defending against non-adjacent opponents.
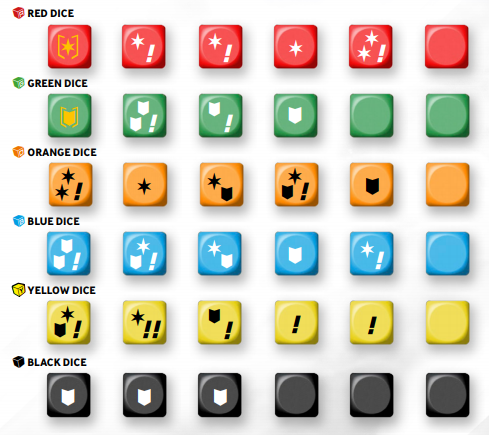
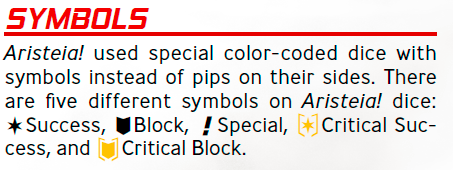
The Dice
The game uses a set of custom dice to determine the outcomes of Actions, Attacks and anything else that has an element of chance. Dice come in six colours – Red, Orange, Yellow, Blue, Green and Black.
Each face can have between zero and three various symbols on it, including duplicates. When rolling dice add together all the symbols, including any that the character scores automatically, into a single pool of results.
There are five symbols that can show up.
- Success – Required in order to successfully use Actions or to deal Damage during Attacks at a rate of one Damage per Success.
- Block – Used to nullify Successes from the opponent’s results on a one-for-one basis.
- Critical Success – Can only be found on Red dice and cannot be cancelled by Blocks. They can be converted into two Successes for the purpose of activating Switches only.
- Critical Block – Nullify an entire dice (or an automatic symbol) from the opponent’s results and so are the only way to nullify a Critical Success. They can be converted into two Blocks for the purpose of activating Switches only.
- Special – No default function but commonly used to activate Switches.
As you can see, Red and Orange dice are best for attacking, Green and Blue for defending and Yellow is best for lots of Special symbols. For Simple Actions, Red, Orange, Blue and Yellow dice are the best in descending order.
Dice Rolls, Actions and Attacking
As in Infinity, there are two main types of dice roll – Simple and Face to Face.
For Simple rolls the only thing that matters, other than for the purpose of Switches, is that you have one or more Success results. Simple rolls typically only apply to Actions and if you don’t score at least one Success then the Action you are taking will fail.
Face to Face rolls are used for basically everything else.
When Attacking and Defending you perform what is known as a ‚Combat Roll‘. Any Successes that are not nullified (or used for Switches) will cause Damage to the opponent. Note that this means that the attacker may well end up taking Damage, and it is possible for both the attacker and the defender to take Damage from the same attack. When defending, a character may cause Damage even if they don’t have an Attack of their own or if their Attack would normally be out of range.
For Disengaging (moving away from an adjacent opponent) you need at least one Success remaining in order to be successful. Excess successes do not cause Damage when Disengaging. It is very possible for characters with high Brawn to pin low-Agility characters in place!
Characters
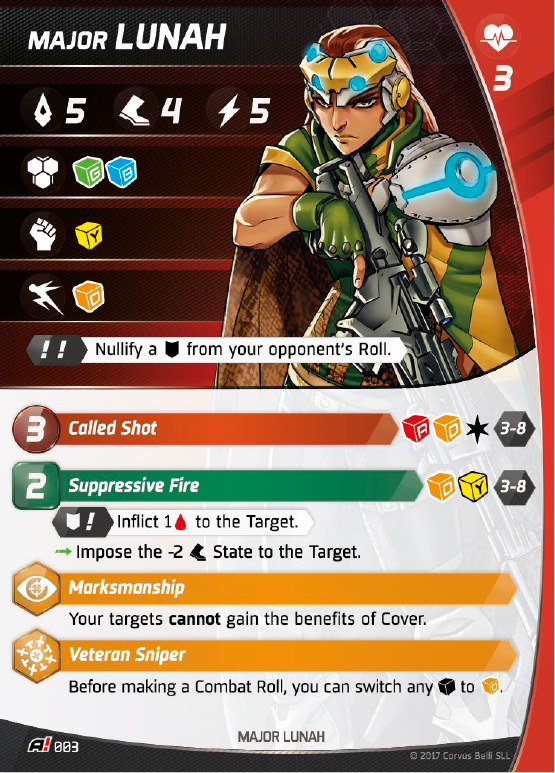
Above you can see the character card for Lunah and she’ll be our example for today. All characters have a card that shows all the different things they can do in the game as well as all their relevant stats.
Information on the other characters will be in another blog post soon and you can find concept art and character models for all of them in my Arisetia seminar writeup.
We’ll look through her card step by step and go over what everything means.
Attributes
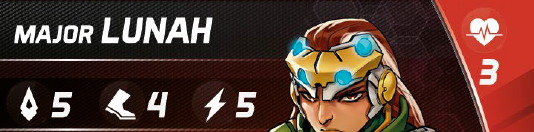
Across the top you can see her Name, Initiative value (5), Speed (4) and Energy (5). In the top right you also have her Health (3).
- Initiative is used to determine which player controls the order that characters will activate in. Initiative values for existing characters are between 4 and 7.
- Speed shows how many Movement Points the character will gain when using the Move Action for 2 Action Points. Characters seem to have between 3 and 5 Speed.
- Energy is how many Action Points they receive each turn. All characters have 5 Energy.
- Health is how much Damage they can take before being KO’d and going to the Infirmary. So far this ranges between 2 and 7.
Abilities
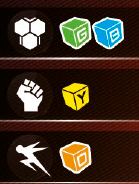
Her abilities going down the left are her Defence (Green+Blue dice), Brawn (Yellow dice) and Agility (Orange dice). These each show how many and which dice need to be rolled when each Ability is called upon.
- Defence shows the dice that are rolled when opposing enemy Attacks.
- Brawn is used to negate opposing Disengage attempts.
- Agility is used to Disengage (move away) from opponents in adjacent Hexes.
If a character fails their Disengage attempt (i.e. rolls no Successes or has all their Successes nullified by Blocks) then not only can they not move but they also lose all their remaining Movement Points. Oops!
Locking down characters, especially non-combat or ranged ones, by standing adjacent to them is a big tactic and Lunah has a poor chance of disengaging once pinned down. This weakness can be negated somewhat by having other characters who can Place or Displace either her or the enemy character she is adjacent to, allowing her to move away freely.
Switches
She also has a Switch of !! (two Specials) which she can use to nullify a Block from an opponent’s roll, effectively removing that result from their pool. Switches like this can be activated whenever you roll one or more dice and may be activated multiple times in a row if sufficient symbols are rolled. Different Switches might need Blocks, Successes or some combination of symbols to activate.
When activating a Switch you are effectively using up the relevant symbols from your results. If a Switch required a Block, for example, then that same Block can’t also be used to nullify an opponent’s Success.
This Switch is almost exclusively going to be used in order to make her attack more powerful, although this isn’t true for all Switches as many have uses beyond just dealing more damage.
The active player (i.e. the one that controls the active character) always gets to decide which players may activate all their Switches first. If a player does not use a Switch during a particular roll when they first have the chance then the opportunity is wasted.
Attacks
Lunah has one attack – Called Shot – which is listed in orange and has a range of 3-8 Hexes, where Range 0 is your own space and 1 is adjacent. This means she can’t attack adjacent targets at all.
The number on the left (3) is the amount of Action Points it costs to use, so given her Energy of 5 this means she can normally only use it once per turn.
When she attacks with it she rolls Red+Orange against the target’s Defence, with any Successes exceeding the opponent’s Blocks causing a point of Damage. In addition she gets an automatic Success added to her results, as denoted by the Success symbol. It’s a pretty decent attack.
Keep in mind that if the opponent scores any Successes then they may cause Damage back to Lunah also, and Red and Orange dice are quite poor for rolling Blocks!
All characters also have a really poor attack they can use, but it’s almost never worth it as far as I can tell. This Contender Attack is never listed on the character’s card as it is common to everyone.
Actions
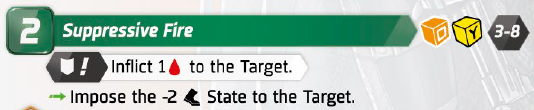
Lunah also has an Action – Suppressive Fire – which has the same range brackets as her Attack (3-8). It costs 2 Action Points to use and allows her to roll an Orange and a Yellow dice.
If she succeeds by rolling at least one Success than she applies the effect shown after the green arrow, giving the target a -2 Movement State
It is notable that if she does not need to move at all then as standard she has sufficient Energy to use Called Shot and Suppressive Fire in the same Activation.
In addition, she has a Switch here too. In this case she can deal a point of Damage to the target if she rolls a Block and a Success. Keep in mind that Actions are not opposed, so she can potentially deal Damage without the opponent being able to respond.
Switches listed directly under Attacks or Actions can only be triggered during those Attacks and Actions, so she can’t use this Switch whilst Defending for example.
In addition, all characters have the Move Action available to them. Each time they use Move they gain a number of Movement Points equal to their Speed – four for her.
Some Actions, like Move, have a different green arrow symbol and no dice associated with them. In such a case the effect always applies and doesn’t need any Successes.
Movement points can be used to move from one Hex into an adjacent, unoccupied one and do not need to be spent in one go. You can spend some to move, Attack and then move again if you want and you don’t need to commit to spending any before you are ready to do so.
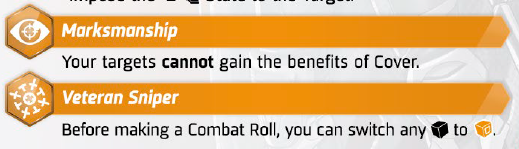
Automatic Skills
It’s also possible for characters to have Automatic Skills that function in a passive manner. You can’t choose to activate them using Energy, but rather they can provide situational buffs or alternative options. In Lunah’s case she has two such Skills.
The first is always on and denies the Cover bonus to her targets. This negates the Black dice that they would otherwise receive. The second allows her to switch a Black dice (typically gained from being in Cover) to an Orange one, which is far more aggressive.
Both Attackers and Defenders can claim the bonus for cover when they are adjacent to a space that is blocked/occupied by another character or obstacle and that partially blocks line of sight to the target. Cover does not apply to Actions.
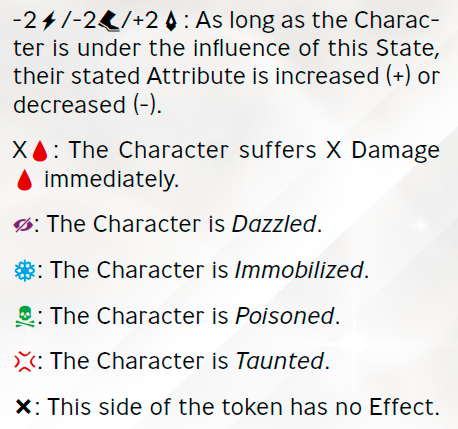
States
Various Switches, Skills, Attacks and Actions can inflict status effects on an opposing character and a token is placed next to the affected character. At the end of each character’s Activation you flip over any State tokens on them. Some have a, generally lesser, penalty on their obverse face and some have no penalty at all. An already flipped State token would be removed outright instead.
With the exception of Poison, States to do not stack with themselves.
Here is a summary of the State effects:
- Plus (or Minus) Attibutes. The chracter receives a temporary bonus or penalty to the relevant Attribute. These start at +/-2 and become +/-1 on the subsequent turn.
- Dazzled. The character cannot draw Line of Sight beyond the 0-1 range or cause damage whilst defending against an attacker outside range 1-1.
- Immobilized. The character cannot spend Movement Points, but may still be Placed, Displaced or Swapped.
- Poisoned. The character receives one point of Damage per Poisoned token at the end of their Activation.
- Taunted. The affected character can only choose the character that inflicted this state as the target for their Attacks. Their Actions may still target whoever they like.
Dazzled, Immobilized, Poisoned and Taunted all have no effect on their flipped face and so effectively only last for a single Activation.
The Infirmary
When a character takes Damage equal to their Health they are sent to the Infirmary and are not able to take further part in that Round, possibly meaning that they miss their Activation. The opponent draws a Tactics card as a reward and also gains a Frag token to keep track of their kill count for tiebreaker purposes.
When a character moves to the Infirmary all tokens, including State tokens, Damage markers and so on, are removed from them. They also cannot be affected or affect the game by any other effect, unless explicitly specified.
At the end of the round they get a -2 Energy State token. This will significantly reduce their options in the next couple of turns.
Creating Teams
The stock Aristeia game is being released with eight characters (watch this space for more info on each of the characters!) with plans to release more in expansion packs. Teams are made up of four characters chosen in any combination, although obviously you cannot have duplicates on the same team.
Characters don’t have particular affiliations or factions that reduce your ability to mix and match although some may have loose synergies with each other. There are no points values or other restrictions.
Teams can therefore be geared towards certain tactics – doing lots of damage, inflicting statuses, board control and so on – or be made to be more generalist with a healer, controller, tank and damage dealer, for example.
Each character also comes with four possible Tactics cards…
Tactics
As part of the team building process you will also need to build a deck of Tactics. This consists of 10 ’stock‘ cards that are common to all teams and then two cards for each character in your team, chosen from the four that they come with. The cards belonging to characters are often quite powerful and some can be only be used on the character they came from. They typically compliment the character’s theme or play-style.
Exactly which Tactics you choose to use in a given game is decided after seeing your opponent’s team of characters. This gives you some ability to respond to your opponent’s lineup and tailor your deck accordingly.
Each player starts with a hand of four cards during the game and accumulates more by putting opposing characters in the infirmary (by reducing them to zero health) and after each round. A player may mulligan their original hand of cards once at the start of a game.
Tactics cards can be used for a range of benefits, including rolling extra dice, getting additional actions and various movement/status related buffs and debuffs. Each can only be used once before being discarded and so it is very possible that you will run out before the end of a particularly bloody game.
Round Sequence
Each player secretly determines the order in which their characters would activate each Round by placing their ‚initiative cards‘ face down in a row with the leftmost being the first character to activate. This is known as the Running Order.
They will then each reveal their first characters in the Running Order and the character with the highest Initiative can determine which of the two will activate first. In case of a tie the Underdog (determined by having the lowest combined initiative across all characters in the first round, or the player with the lowest score subsequently) decides the order. This process is then repeated for the remaining three characters of each team in order.
The Underdog also decides what order players may play Tactics in, which Deployment Zone they prefer, which player deploys a character first (after which it alternates) and the ordering in any other circumstance where there may be simultaneous effects. There is definitely potential for people to deliberately aim for Underdog status.
If a character is sent to the Infirmary before their Activation then they effectively miss a turn. This is a powerful tactic and a well timed attack can significantly disrupt the opposing team.
At the end of the Round objectives are scored and characters leave the Infirmary, albeit in a weakened state.
Activation
When a character activates, they go through many steps which are summarised below
Preparation Steps. The character gains Action Points equal to their current Energy. If the model was Benched (in the Infirmary) then they are placed in any free space in a Deployment Zone that isn’t currently being used as a Scoring Zone (including next to an opposing character!).
Actions Step. The character spends their Action Points on Actions and Attacks. They can spend these in any order and there is no obligation to declare their use at the start of the Activation. Any unspent Action or Movement Points at the end of the Activation are lost and not carried over to the next turn.
States Step. Remove all flipped State tokens and then flip any un-flipped ones.
Winning
Points are scored at the end of each Round based on controlling the scoring zones, although which in particular need to be controlled and how many points are awarded will depend on the scenario you are playing. Typically this is 2 or 3 points for controlling the scoring zone by having more characters in it than the opponent, or 1 point for having the same amount and at least one.
The game normally ends when one player accumulates 8 points or at the end of the fifth Round, whichever comes sooner. The player with the greatest points total wins and the tiebreaker is the number of opposing characters each player has sent to the Infirmary.
With only five rounds to play, Aristeia is quick and brutal!
Quelle: Lead Rising Blog

Klingt spannender als ich erwartet habe….das Hexfeld kann optisch nicht mit den sehr knalligen Artworks der Karten mithalten, aber da sollte ja CB genügend etablierte lizenzierte Geländehersteller an der Hand haben.
Ich halte mir mal etwas Geld zurück,vlt riskiere ich doch eine Vorbestellung
Klingt auf jeden Fall interessant. Die Würfelmechanik ist etwas ungewöhnlich aber kklingt spannend. Mal abwarten.
Naja so neue ist die Mechanik auch nicht bei Brettspielen der letzten Jahre sogar relativ üblich.
So lassen sich verschiedene Würfelstärken mit der gleichen Form abbilden.
Klingt spannend. Bei der genialen Firma habe ich große Zuversicht, dass das sehr viel Spaß machen wird. Ein Autobuy.
Ob das wohl übersetzt wird?
Und weiß einer, ob es verschiedene Felder geben wird.
Wenn nicht ist meine Motivation groß Schon mal eins aus Styro zu bauen.
Ich bin vor allem gespannt wie die Qualität der Figuren wird, denn diese sollen ja aus Plastik sein.
Das geht mir genau so. Die bemalten Minis die man bis jetzt gesehen hat waren wohl masters. Ich möchte auf jeden Fall erst die Minis in Roh sehen bevor ich Geld investiere.
Da sind wir alle gespannt. Aber ich bin mir ziemlich sicher dass wir das vor Release zu Gesicht bekommen.
Im Moment kann man ja sowieso noch kein Geld investieren. Außer Ende 2017 steht ja noch nix fest.
Wobei ich da guter Dinge bin. Corvus Belli sind ja generell eher pingelig was die Qualität ihrer Minis angeht.
[Edit] Gerade im Forum dieses Bild hier gefunden. Keine Kommentare dabei. https://pbs.twimg.com/media/DIFFCu0WAAA_z5V.jpg:large [/Edit]
Danke für das Bild. Ist halt ein Schnappschuss von schwierig zu fotografierenden grauen PVC, aber zb der Torso des Samurai sieht nur ok aus…mal gucken wann echte Nahaufnahmen kommen….oder ein optionales Metallfiguren Addon
Danke für das Bild. Da sieht man ja immerhin schon mal etwas.
Ne Metall-Option würd ich sehr begrüßen, wenn es sich für CB auch lohnt.
Die Wahl zu haben ist immer besser.
Es wird einen limitierten Metalrelease geben. Wurde heute auf fb verkündet
Schade das man nicht „normale“ Würfel nimmt… Basierend auf dem Infinity system … Aber so bin ich leider raus…
Ich habe in den letzten Jahren diese proprietären Würfel lieb gewonnen – statt Tabellen oder zig. Modifikatoren hat man alles in den Spezialwürfeln abgebildet. Und da das hier ja ein Brettspiel ist und einfach zugänglich sein soll machen die Würfel aus meiner Sicht mehr Sinn als nur damit es zu Infinity passt auf einen W20 zu setzen.
Ja, natürlich tun sie das. Wer Infinity will, spielt halt das.
Und wer Aristeia mit anderen Minis (zb Infinity) zocken will, tut das auch. Es kann so einfach sein.
Hier nochmal ein Blog-Artikel was CB mit dem Spiel so noch vor hat:
https://www.aristeiathegame.com/blog/item/380-inside-aristeia
Da taucht nun zum Ersten mal das Preorder-Datum und der endgültige Preis auf